Question
How do I setup Pulse Secure VPN for use with the OCP VPN?
Overview
The OCP VPN (virtual private network) client provides secure access to OCP services from outside the OCP network, such as access to shared files from home or Advance Web from elsewhere on campus. Follow the instructions below to use the OCP VPN client. If you need further assistance, please contact the IT Express Help Desk at 754-HELP.
Answer
From your work computer:
- Verify that the Pulse Secure VPN is installed and running on your computer: In the System Tray, next to the clock on the taskbar, look for the icon circled below. You may need to click the arrow to show all icons.
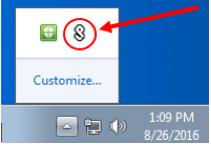
If you do not see the Pulse Secure icon, restart your computer to initiate the install. You should see the icon after you log in - if not, please contact the IT Express Help Desk for assistance: 754-HELP.
- Configure the OCP VPN connection:
- Right-click the Pulse Secure client in the system tray and choose Open Pulse Secure.
- If you see OCP VPN listed under connections, proceed to step 3; otherwise continue here:
- Click the + icon to add a connection
- Leaving Type as is, enter the following:
- Name: OCP VPN
- Server URL: pulse.ocp.ucdavis.edu
- Click Add
- Connect to OCP VPN:
- Click the Connect button on the OCP VPN connection
- When prompted, enter your Kerberos/AD3 username and password as below.